
| 일 | 월 | 화 | 수 | 목 | 금 | 토 |
|---|---|---|---|---|---|---|
| 1 | 2 | 3 | 4 | 5 | 6 | |
| 7 | 8 | 9 | 10 | 11 | 12 | 13 |
| 14 | 15 | 16 | 17 | 18 | 19 | 20 |
| 21 | 22 | 23 | 24 | 25 | 26 | 27 |
| 28 | 29 | 30 | 31 |
- IT공부
- 백엔드개발자
- 백준 java
- 프리온보딩
- IT개발자
- 코딩테스트
- IT개발
- 백엔드 개발자
- IT
- apm 수동설치
- Java
- 개발자취준
- 백엔드
- 코테
- 프로그래머스
- IT취준
- 개발공부
- 원티드
- 기술면접
- 알고리즘풀이
- 알고리즘
- cs지식
- 프리온보딩 백엔드 챌린지
- 자바
- 백준
- 개발자
- 코딩
- IT취업
- 백준 자바
- apm 소스설치
- Today
- Total
코이팅
APM 소스 설치(수동 설치)방법 - Apache(아파치) 본문
1. APM 개념
- A(Apache) : 웹서버
- P(PHP) : 웹 프로그래밍 언어
- M(MYSQL) : 데이터베이스
이 3가지가 연동되어 운영되도록 만든 환경을 APM이라고 합니다.
Apache와 MySQL이 PHP와 호환성이 좋기 때문에 주로 세 프로그램을 묶어 패키지 형태로 사용합니다.
2. Apache란?

아파치는 Apache 재단에서 만든 웹 서버용 소프트웨어입니다. 아파치는 HTTP 아파치 서버로 불리고 이 아파치는 HTTP 웹 서버입니다. 이 아파치는 많은 운영체제에서 운용할 수 있습니다.
예를들면 BSD, 리눅스 등 Unix 계열 뿐만 아니라 우리가 사용하는 마이크로소프트 윈도우 등 여러 기종에서 사용이 가능합니다. 따라서 세계에서 가장 많이 쓰는 웹 서버 중 하나입니다. 구축이 쉽다는 이유 때문에 많이 사용합니다.
3. 소스(수동) 설치 이유?
APM을 설치하는 방법에는 패키지 관리자를 사용하여 패키지들을 설치하는 방법과, 직접 웹에서 압축파일을 받고 압축파일을 풀어 소스를 컴파일하여 설치하는 방법이 있습니다.
패키지 관리자를 사용하면 쉽게 설치할 수 있습니다. 하지만 우분투(Ubuntu)를 예로 들면 apt라는 리눅스 계열의 패키지 관리 명령어 도구가 있는데, 개인적인 목적이 아닌 회사에서 업무적인 목적이나 공공이 사용하는 경우에는 패키지 설치를 막을 수 있어서 소스설치를 한다고 합니다.
4. Parallels + Ubuntu 20.04.1 설치
저는 M1 칩을 내장한 맥북 사용합니다. 따라서 Parallels를 사용합니다. 아래 링크를 보고 Parallels와 Ubuntu를 먼저 설치해주세요.
https://king-ja.tistory.com/91
맥북 Parallels & Windows 11 설치방법 (맥북 윈도우 설치방법)
1. Parallels & Windows 11 설치 1) Parallels를 설치하기 위해 아래 링크로 접속합니다. https://www.parallels.com/kr/?x-clickref=1100lwv69Mef&utm_source=pz&utm_medium=affiliate&utm_campaign=default Parallels: Mac 및 Windows 가상화, Remot
king-ja.tistory.com
5. Apache 소스(수동) 설치방법
✅ 개발환경
- macOS Ventura 13.1
- UTM
- Ubuntu 20.04.5
- MySQL 8.0.32
1) 우분투에 로그인하고 아래 사진의 빨간 박스 부분을 클릭합니다.

2) 검색창에 'terminal' 입력 후 2️⃣을 클릭합니다.

그럼 아래 사진처럼 터미널 창이 열립니다.

3) 필수 패키지를 설치합니다.
터미널 창에 아래 명령어들을 입력해주세요.
$ sudo su
$ apt-get install gcc
$ apt-get install --reinstall make
$ apt-get install libexpat1-dev
$ apt-get install g++
4) apache 폴더를 생성합니다.
- 경로 : /usr/local
$ sudo su
$ cd /usr/local
$ mkdir apache # 해당 디렉토리에 apache 폴더를 생성
5) 소스설치 파일을 다운로드합니다.
- 경로 : /usr/local
💡apr-1.7.0
$ wget http://mirror.navercorp.com/apache//apr/apr-1.7.0.tar.gz- wget : web get의 줄임말로 웹 서버로부터 파일을 다운로드 합니다.
💡apr-util-1.6.1
$ wget http://mirror.navercorp.com/apache//apr/apr-util-1.6.1.tar.gz💡pcre-8.43
$ wget https://sourceforge.net/projects/pcre/files/pcre/8.45/pcre-8.45.tar.gz💡apache-2.4.55
$ wget https://dlcdn.apache.org/httpd/httpd-2.4.55.tar.gz✅❗️apache는 최신 버전을 설치해야 오류가 발생하지 않습니다. 아래 링크에서 최신 버전을 확인하고, Source - tar.gz의 링크 주소를 복사하여 사용합니다.
https://httpd.apache.org/download.cgi
Download - The Apache HTTP Server Project
Downloading the Apache HTTP Server Use the links below to download the Apache HTTP Server from our download servers. You must verify the integrity of the downloaded files using signatures downloaded from our main distribution directory. The signatures can
httpd.apache.org
6) 소스설치 파일을 압축 해제합니다.
$ tar xvfz apr-1.7.0.tar.gz
$ tar xvfz apr-util-1.6.1.tar.gz
$ tar xvfz pcre-8.45.tar.gz
$ tar xvfz httpd-2.4.55.tar.gz- tar xvfz : tar.gz 형식으로 압축되어있는 파일을 압축해제
7) apr을 설치합니다.
- 경로 : /usr/local/apr-1.7.0
$ cd apr-1.7.0
$ ./configure --prefix=/usr/local/apr
$ make
$ make install
8) apr-util을 설치합니다.
- 경로 : /usr/local/apr-util-1.6.1
$ cd apr-util-1.6.1
$ ./configure --prefix=/usr/local/apr-util --with-apr=/usr/local/apr
$ make
$ make install
9) pcre를 설치합니다.
- 경로 : /usr/local/pcre-8.45
$ cd pcre-8.45
$ ./configure --prefix=/usr/local/pcre
$ make
$ make install
💊 libtool: warning: relinking 'libpcrecpp.la'

the warning is not about you or the package doing anything wrong, it's about a potentially slow operation at the install stage (slow operations at the build stage are expected and don't need a warning).
https://stackoverflow.com/questions/29659569/what-is-relinking-warning
What is `relinking` warning?
While compiling mpich, I got a few relinking warnings... libtool: warning: relinking 'lib/libmpicxx.la' I have not been able to find out what these mean by googling the error message. What is rel...
stackoverflow.com
10) Apache(2.4.55)를 설치합니다.
## 옵션 변경 전

$ cd httpd-2.4.55
$ ./configure --prefix=/usr/local/apache2.4 \
--enable-module=so --enable-rewrite --enable-so \
--with-apr=/usr/local/apr \
--with-apr-util=/usr/local/apr-util \
--with-pcre=/usr/local/pcre \
--enable-mods-shared=all
🚨 실패 : configure: error: Did not find working script at pcre-config
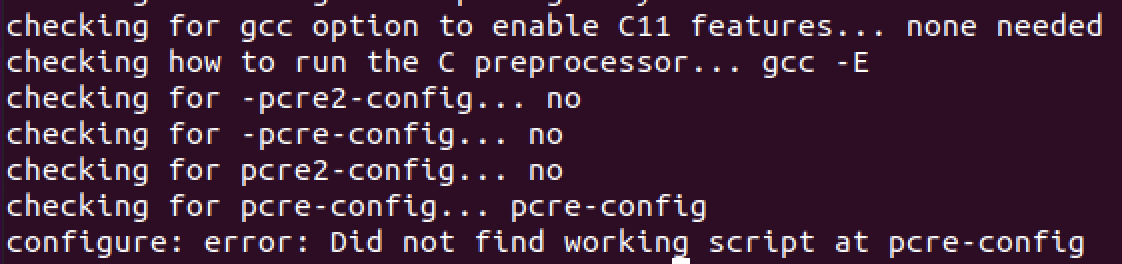
"configure: error: Did not find pcre-config script at pcre-config"라고 뜨며 실패 할경우,
그대로 make를 진행하면 안됩니다❗️
위 말은 말 그대로 /usr/local/pcre에서 'pcre-config'란 스크립트를 못 찾았다는 뜻입니다.
이런 경우는 보통 'pcre-script'스크립트 파일이 없거나, 권한이 없거나, 이름이 다른경우입니다.
이럴 땐 한번더 configure에서 "--with-pcre=/usr/local/pcre" 대신 더 정확하게 pcre의 'pcre-config'파일의 절대 위치를 적어주면 됩니다 .
다시 말해서 설치한 '/usr/local/pcre'내부를 들어가시면

이렇게 'bin'이란 디렉토리가 있고, 설치한 pcre버전에 따라 'pcre-config' 또는 'pcre2-config'가 있습니다.
이 절대 위치를 적어주면 됩니다.
따라서 "--with-pcre=/usr/local/pcre/bin/pcre-config"이렇게 옵션을 적어서 실행해주시면 됩니다.
## 옵션 변경 후

$ cd httpd-2.4.55
$ ./configure --prefix=/usr/local/apache2.4 \
--enable-module=so --enable-rewrite --enable-so \
--with-apr=/usr/local/apr \
--with-apr-util=/usr/local/apr-util \
--with-pcre=/usr/local/pcre/bin/pcre-config \
--enable-mods-shared=all

$ make
$ make install
11) Apache를 실행합니다.
- 실행 : httpd -k start
- 종료 : httpd -k stop
$ sudo /usr/local/apache2.4/bin/httpd -k start🚨 실패 👉🏻 AH00558: httpd: Could not reliably determine the server's fully qualified domain name, using 127.0.1.1. Set the 'ServerName' directive globally to suppress this message

에러는 아니고 ServerName을 정하라고 뜹니다. ServerName을 지정합니다.
다음과 같은 명령어로 편집기를 열고 서버네임을 지정해주면 됩니다.
$ vi /usr/local/apache2.4/conf/httpd.conf

ServerName localhost- 'a'를 누르면 입력모드로 바뀝니다. 👉🏻Insert 모드
- 변경 후 저장하고 나가려면 'esc'를 누르고 ':wq!'를 치고 엔터를 누릅니다. (:q! 👉🏻 저장 안하고 나가는 것.)


12) 이후 아래와 같이 진행합니다.
$ ps -ef | grep httpd | grep -v grep
$ netstat -anp | grep httpd

#netstat 이 없을시 아래의 명령어로 설치
$ apt-get install net-tools

$ curl http://127.0.0.1

# curl 이 없을시 아래의 명령어로 설치
$ apt-get install curl
아래 사진과 같이 뜨면 성공입니다.

13) firefox에서 실행을 확인합니다.
- firefox 주소창에 localhost을 입력하고 It works!가 나오면 설치가 잘 된 것입니다.
- Ubuntu 20.04에서는 기본적으로 firefox 웹브라우저가 존재합니다.


'Server' 카테고리의 다른 글
| Mac에서 Linux(Ubuntu) OS & UTM 설치방법 (5) | 2023.01.29 |
|---|---|
| APM 소스 설치(수동 설치)방법 - MySQL (1) | 2023.01.29 |
| 맥북 Parallels & Windows 11 설치방법 (맥북 윈도우 설치방법) (0) | 2023.01.28 |
| Mac에서 VirtualBox, CentOS 9 설치방법 - Mac(M1) (0) | 2023.01.27 |
| 가상 머신(VM) 개념, 종류 (0) | 2023.01.27 |


